Tuesday, September 11, 2012

Walking on Water in Algoquin Park

The view from a mid-way portage.
A couple weeks ago I went on a beautiful back country trip through Algonquin Park. I thought I'd share some of the photos of my journey.


Cooking dinner over the campfire...
The path from the water to my first campsite on Burnt Island Lake

My 'boat' (a paddleboard) after a very long
hard day getting to my first campsite.

My paddling setup


My camp
River paddling, my favorite!


Bartlett Lake, I had this all to myself for 1 night,
and had a beautiful evening of paddling on a mirror-like surface.

Beautiful loons, their calls were a constant
soundtrack to my time in the park.


Last day and conditions couldn't be better.


My point of view for four days, someday I will hopefully make another long trip this way. I completely fell in love with stand up paddle boarding on this trip.

Sunday, August 5, 2012

The Importance Of Being...


"Wherever you go, there you are"


I came upon my current sit spot the other day while exploring a narrow path following a small ridge-line near where I'm living at the moment. It's been a short while since I've taken the time for this, and I've  been feeling the lack of this set aside time. As soon as I walked along the path and saw the bowl shaped depression with this one boulder halfway up the slope, i knew I had found a special place for myself. The kind of place where just being there sets you apart from all the usual in life. A place that calls upon you to sit quietly, listen to the birds, watch the trees in the wind, notice the wildflowers growing all around. A place where you can just be.


"All you need is to keep quietly alert, enquiring into the real nature of yourself" 
- Sri Nisargadatta Maharaj


I think its important to be able to take time to calm the mind and find peace within any lifestyle. It's important to always notice the beauty in all that is around you. For myself, a sit spot is a way of keeping present, wherever I am in the world. 

This is one place, where I find extraordinary beauty, at which I can get away from the usual,  sit, and watch the world around me.

Saturday, August 4, 2012

A Little Walk Through The Woods.

I had two days off in a row this week, and took the time to go on a longish walk and overnight trip to a nearby waterfall. The walk ended up being very very buggy, but the reward of a beautiful camp spot at the end was worth every mosquito and deerfly bite. The waterfall was beautiful, and even better, bug free. I camped the night in my new Hennessy Hammock (tent meets hammock), and walked back the next day.


I took pictures along the way to share the journey with anyone interested...


The path started out on a road, but slowly got rougher and nicer to hike.


 Plenty of swampy areas, a mosquito's paradise. Eventually the trail met up with a somewhat swift river, and the bugs lessened.


The Cardinal Flower (Lobelia Cardinalis) was in bloom at the riverside. These beauties told me I'd found my campsite for the night.


And this is where the roar was coming from. Around the corner and to the waterfall. 

If you look closely at the bottom left of the picture you can see a Great Blue Heron. He was kind enough to share his home with me for the night. I spent the evening watching him fish at the base of the falls.


Top of the Falls!


The path at this point is a well maintained Portage, with a fire-pit /campsite at the top.

Sunday, July 8, 2012

Partial Hiatus

Hello All, and thank you for reading my blog. I've been a bit quiet the last couple weeks on this page. The reason, I've moved to work in a wilderness retreat/hostel for the summer and, not too surprising, my internet is slightly limited out here. I have some interesting things I've been working on I'd love to post, and I've been doing lots and lots of foraging and learning much about new and different plant friends here. 

I will hopefully post occasionally this summer, otherwise, have a great summer and enjoy the bounty of Canada in its warm season, or wherever you are. Peace.

Wednesday, June 27, 2012

Growing Easy As Could Be


I have a lot of friends who live in apartments in the city, most of whom don't have a lot of space or time to be working on a veggie garden. When I came across this design on the internet about a month ago, it just screamed great urban agriculture to me. This lil' planter only needs a bit of window light, and even better, it waters itself. This is a perfect project if you live in a cramped space and/or are a little bit slack when it comes to plant care. Super easy to make, materials can be scrounged from your recycle container, and the planter is very low maintenance once complete. A perfect way to grow your indoor herbs and lettuce, or start bigger garden plants. It has a top section, where you have the dirt and plant, and a bottom section which serves as a water reservoir, where water is drawn up into the soil by the planter.

What you Need: 
1 Two Litre Pop Bottle with lid 
String or wire (If you want to hang the planter)
2 strips of cotton fabric 2 cm x 30 cm 
Material to darken the container such as newspaper, fabric, tape...


 Step 1: Take the 2 litre pop bottle and cut it in half. I cut it so the bottom half is slightly larger, somewhere between 1/2 and 2/3 of the way towards the lid end.


Step 2 (optional): If you wish to have a hanging planter, attach some wire or string to the bottom half of the bottle.


I made three holes around the top edge of this half using an awl. Then, since I had some garden wire lying around, I took three pieces of wire. I threaded the wire through the holes, and twisted it around itself to secure.


For the 'hook' that the planter would hang from, I used some pliers to twist the wires together, around in a loop, and twist another couple times around to secure.


Step 3: Making the top half of the planter. The top half of the planter is turned upside down, and sits inside the bottom half of the bottle. Since the top of a pop bottle is slightly larger, is sits quite nicely without sliding down into the bottle bottom half. Here you can see I used fabric to cover the top half. Plant roots don't like the sun, so its better to find a way to give them some shade. Here I took my cotton fabric and glued it to the outside. 


*tip, I also glued the fabric to the inside lip thinking it would look better, turns out if the fabric touches the soil it absorbs moisture and starts to look kind of muddy. Make sure if you use fabric on the outside its not coming in contact with the soil.

Other ideas for shade is to line the container with newspaper, or cover with an opaque tape. I did one planter with black duct tape instead of fabric and it turned out great.
 Step 4: Time for the self watering bit. Here you need your bottle lids, and pieces of cotton fabric. Cut two slits in the pop bottle lid for the fabric to come through. I forgot about the lids and threw them out by accident, so I taped over the bottle top, then cut my slits for the fabric. Thread the fabric through the slits, keep a longer bit inside the bottle top. When the two pieces are together the fabric should just touch the bottom of the bottle.


Step 5: Add the soil! You should now have an empty and dark bottle top, with two long pieces of cotton coming up from the centre of the now screwed on lid. Begin adding soil a little bit at a time, at first keeping both pieces of cotton coming straight up. 
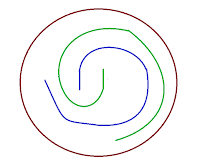
When 1/3 full, spiral one piece of fabric on top of the soil, like the green or blue lines in the drawing to the side. Add another 1/3 of soil keeping the other piece of cotton coming straight up. When 2/3 full, spiral this cotton piece on top of the soil like the other coloured line in the side drawing. Top with another 1/3 soil. You should now have a container full of lovely soil and ready to plant.


I planted basil in this planter, but you can try planting anything you like. When you first plant, give the soil one good drenching from the top. This should be the only time you have to water the plant in the traditional sense. Fill the water 
reservoir up, no higher then where the lid comes down to, and the planter will do the rest. A process of osmosis draws the water up as the soil above becomes dry, keeping your plants happy.  
*I find I need to fill the 
reservoir every 3 weeks or so.

And these are the little basil plants about 2 weeks after planting. This post is written a couple weeks after I took this picture, they now have 4 leaves and are looking more, for lack of a better word, basily....


Thursday, June 21, 2012

Taking The Time To Smell The Roses

Today I've felt so lazy, for no reason I could figure out. I've been almost completely unproductive, but a little while ago I did mange to get myself outside to harvest some wild edibles. 


The wild roses are in bloom, and I'm lucky at my parents house, there is a large patch growing at the side of the driveway and the road. So I collected a basketful earlier today. 


I've got them drying now, to store for later and make some yummy tea now. Later on in the season, the rose hips make a great food source, however the flowers make a lovely fragrant cuppa as well. And they're oh so pretty...


Wednesday, June 20, 2012

Dandelion "Coffee"


I was working in the garden yesterday, and pulled up this gorgeous dandelion root. 

I hadn't thought it was time yet to be harvesting the roots, however this one inspired me to do a quick first harvest of the summer. 


I pulled up a good handful, which was easy after all this rain, and went to working making them into "coffee" grounds.


These roots are full of lots of vitamins, and when roasted, create a drink very similar to coffee, and very delicious. 


So, this is how you do it.


First I picked a small bunch of roots, cleaned off the dirt, and let them dry. 


Then I roughly chopped the roots, and chopped them more finely in a food processor. Next I roasted the chopped roots. I had just a small bunch (really just a cup or two of "coffee"s worth) so this time I pan roasted the roots.


I keep a dry pan on low heat on the stove top until the roots have changed from off-white, to a rich brown colour, and give off a strong, sweet n' smoky scent.


You could also roast much larger batches in the oven, spreading the chopped roots thinly onto baking sheets. Then roasting the baking sheets at 250 deg F for about 2 hours. This pan roasting method took me somewhere between 30 and 45 minutes.


Once roasted, I let the roots cool off a bit, then ground them more finely in a coffee grinder. I use a french press to make my "coffee" so I ground them to approximately the same texture as coarse coffee grounds. They are a different plant than coffee, and do not grind into as consistent a texture.  This doesn't affect the quality of the drink though. Note - for storage, best to store like any herb, in a glass jar out of sunlight.


From there, I prepared the roots the same as I would coffee. In this batch I put 1 tbsp per cup of coffee into my french press, added the just boiled water, and let steep for 5 - 10 minutes.


Next time I would up the amount of dandelion root to 2 tbsp, the first was a little weak for my tastes.


Then all that's left is to sip and enjoy this caffeine free alternative to coffee.